
Root pruning is perhaps the scariest part of bonsai culture especially if you are a beginner. Here I will guide you on how to prune bonsai roots and try to help you remove your fear.
Roots are important to any plant and especially to a bonsai tree. It is the part of the plant that although is not visible to eyes in normal circumstances, plays the most important role in the plant’s survival.
Why prune roots?
If you are growing plants in containers you have to work on the roots of the plant from time to time. In any natural habitat plant’s roots grows a lot more than the stem in search of nutrients and water.
But when the plant is confined in a container, the situation becomes different. Here the roots can not travel as much as they like.
As the space is limited, the roots start to get colonized in particular areas of the pot. If you don’t trim the roots the pot soon becomes oversaturated with roots. The condition is also called root-bound.
If this happens to your plant, it will suffer immensely and may eventually die. No amount of branch or leaf trimming will solve this issue. Sooner or later you have to prune its roots and have to transplant to a larger pot.
Why root pruning is a must for bonsai?
The main objective of a bonsai is to keep trees in a miniature form. So you have to prune its roots, stem, and leaves and repot the plant regularly.
Pruning of roots stimulates the growth of many smaller roots that are crucial for the look and survival of the plant.
Unlike plants that grow in nature, the taproot is not essential for your bonsai tree. One of the main purposes of the taproot is to give anchorage to the plant. But in a bonsai, you have given support to your plant from outside when you wire the plant.
One thick taproot also suppresses the growth of any other smaller roots which can lead to sparse branches with very little foliage.
So root pruning is essential in bonsai tree care. This is an integral part of creating different bonsai styles.
How often you need to prune roots?
Frequency of root pruning in bonsai depends on a few factors. Things like plant species, container size, and environment play a major role in deciding how often you should prune the roots of your bonsai tree.
If the container size is very small the tree will colonize the pot very fast with roots and you might trim the roots every year. In a larger container, it will take some time to get to that situation.
Some species are very slow-growing and will not need frequent root pruning, for others you might have to do it quite regularly to maintain its vigor.
You can also try pruning roots when the bonsai shows symptoms of chlorosis, decline, or pushing out of the pot due to abundant root growth.
When to prune bonsai roots?
As roots are the lifeline of any plant, whenever you prune the roots it will stress out the plant. The plant will have to adjust to the shortage of water and nutrients intake.
So the timing of root pruning should be when the stress for the bonsai is at the minimum, like during the period of quiescence (for tropical plants) or at the time of early spring.
In the springs the stresses to your plant will be lower because of the low transpiration rate.
How to Prune Bonsai Roots:
Tools you need to prune bonsai roots:
Spatula: to help firm down the bonsai soil
Jin plier and Wirecutter: to help with remove wires that bind the tree into the pot and to replace it with new wire ties finally tie the bonsai into the pot.
The sickle: for cutting the bonsai out of the pot
Plastic brush: to clean the bark
Metal brush: to clean the pot
Coco brush: to tidy up the surface of the pot
Root cutter I: to cut the finer roots
Root Cutter II: to cut the heavier roots
Metal chopstick: for clearing the top of the root surface
Root pruning in bonsai is quite a simple process. You start by simply un-potting the plant. Once you remove the bonsai from the pot, start combing out roots radially with the help of a root hook.
The hook will help you untangle and straighten roots without much damage. You can either buy these or make yourself. Alternatively, you can use chopsticks to untangle the roots, if the plant is very small.
Don’t get lured by the idea to blast the root ball with water and remove the old soil. This might be helpful for some bonsai species, but it causes more harm to the fine root hairs than combing out the soil.
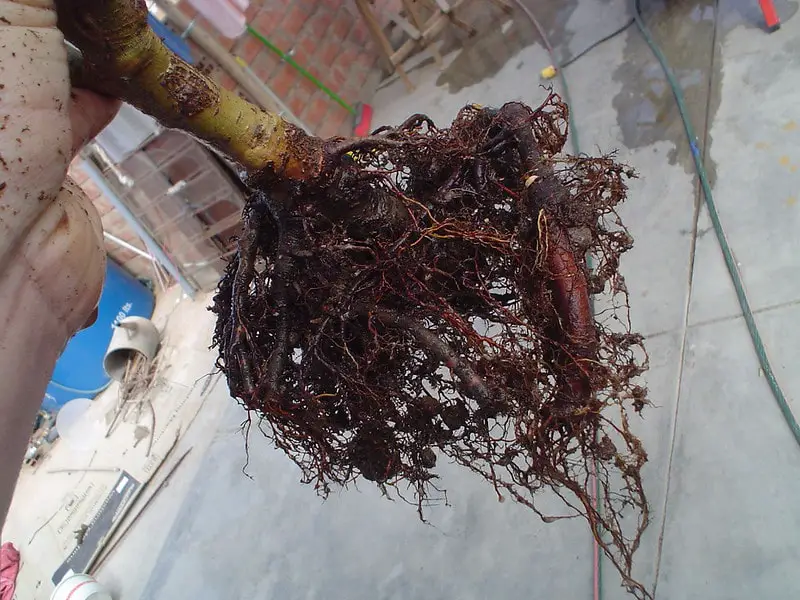
There are two types of roots: the Taproots and Fibrous roots (thread roots). Pruning of Fibrous roots is generally done for root bounding.
For a bonsai, you first trim the larger thick roots. The smaller roots are much more efficient at absorbing water and nutrients. These fibrous roots are a crucial factor for a plant’s survival after root pruning.
If you are converting a container plant into a bonsai a lot of root pruning needs to be done.
The root system in a bonsai is substantially shallower than any nursery plant. So most of the lower portions of the one gallon or five-gallon pot must be removed.
It is not advisable to directly move a nursery plant to a bonsai pot. You have to do it by gradually shifting to smaller pots. After a year or two, you can safely do further root pruning and shift to the final bonsai pot.

When you cut roots, you need to be a little careful but do not get scared. Do it selectively. To be on the safe side do not remove more than two-thirds of the roots of a container plant. Start pruning conservatively and as you gain confidence, progress to more severe root pruning.
Next, remove the remnants of taproot under the crown and also remove circling roots. Trim the roots all around so you can easily fit the bonsai in its new container. Keep most of the fine roots intact.
Now once you completed trimming the roots, prepare the pot where you want to place the bonsai. Make a shallow layer with the soil and place the root ball on top of that layer.
Next, pour soil into the spaces between roots. Make sure there is no air space in between, we don’t want that. With the help of a chopstick keeping poking the soil till there is some resistance to ensure soil is filled and there are no air pockets.
Last but not the least, water thoroughly. This is something that you need to do and watch carefully. Because watering ( as it sinks in) may reveal some places where you’d want to add just a bit more soil.
Water a couple of times, so it settles the soil and washes out the fine materials.
I hope the process I mentioned here helped you some way. Take small steps and build confidence and very soon you will master the art. All the best.