Let me be honest with you: if your bonsai’s trunk looks like a toothpick, people won’t see a masterpiece—they’ll see an unfinished project. The trunk isn’t just part of your bonsai; it is your bonsai. It is more like the foundation of a house. You can have beautiful walls, perfect windows, and an immaculate roof, but if the foundation is weak, the entire structure suffers.
The thing that separates casual bonsai enthusiasts from serious cultivators: they understand that trunk development is a long-term investment. It’s not sexy. It doesn’t happen overnight. But when you finally achieve that thick, tapered trunk with graceful nebari (surface roots), you’ll understand why every master bonsai artist prioritizes it above everything else.
In this guide, I’m going to walk you through six proven methods to thicken your bonsai trunk—from the patient, methodical approach to the aggressive, results-driven techniques. Some take years. Others deliver visible results in months. By the end, you’ll know exactly which method fits your situation, your species, and your timeline.
Why Trunk Thickness Matters
Before we dive into the how, let’s talk about the why. Because honestly? If you don’t understand why trunk thickness matters, you’ll lose motivation halfway through the process.
The Aesthetic Argument
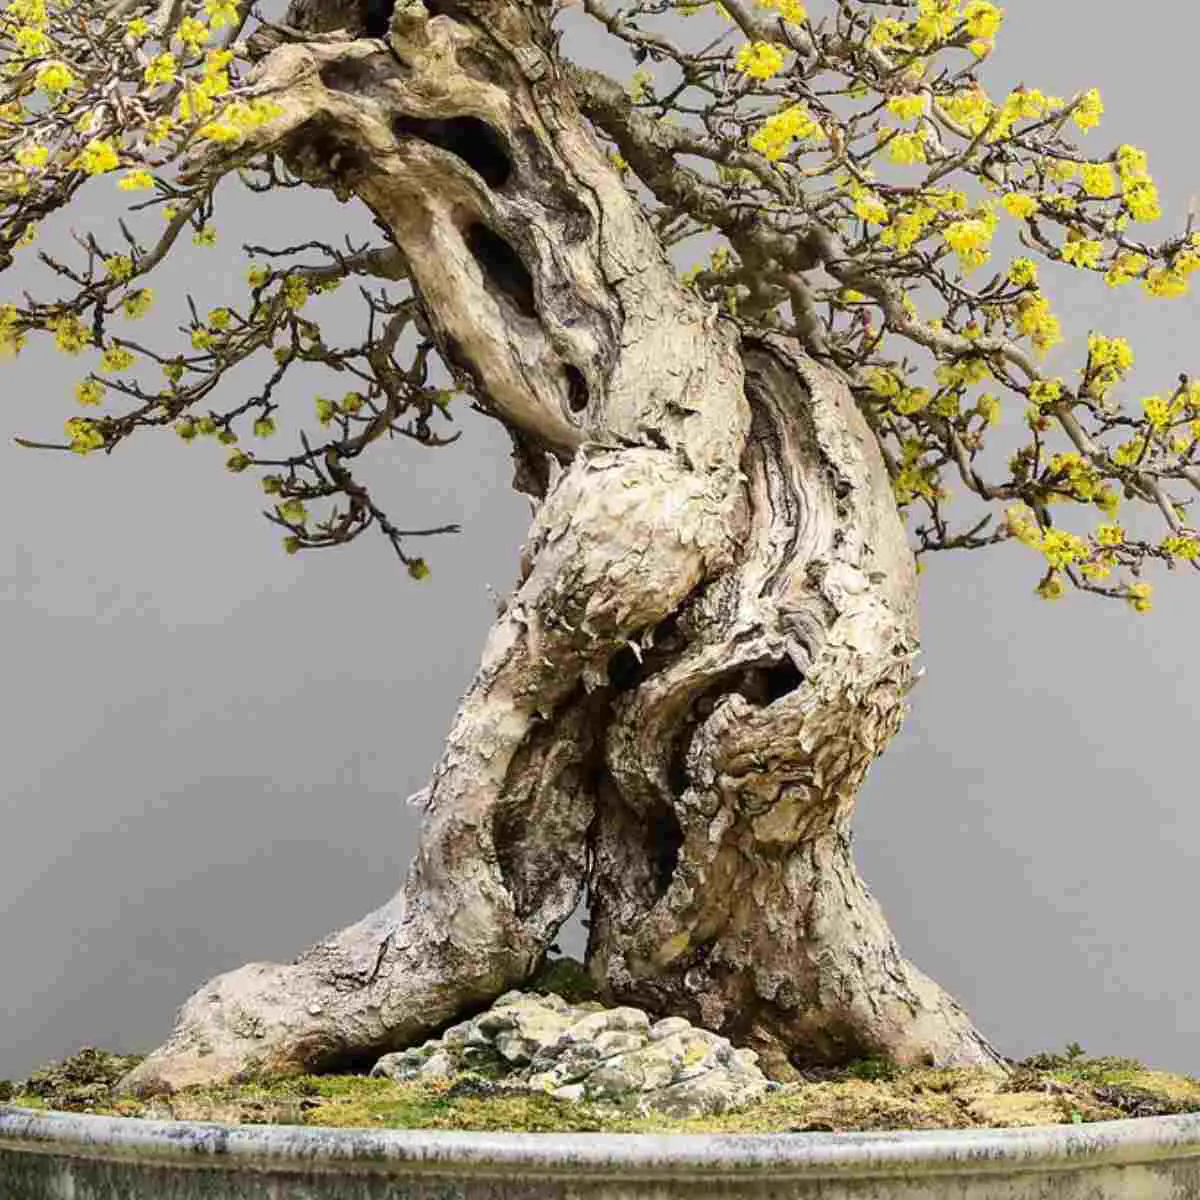
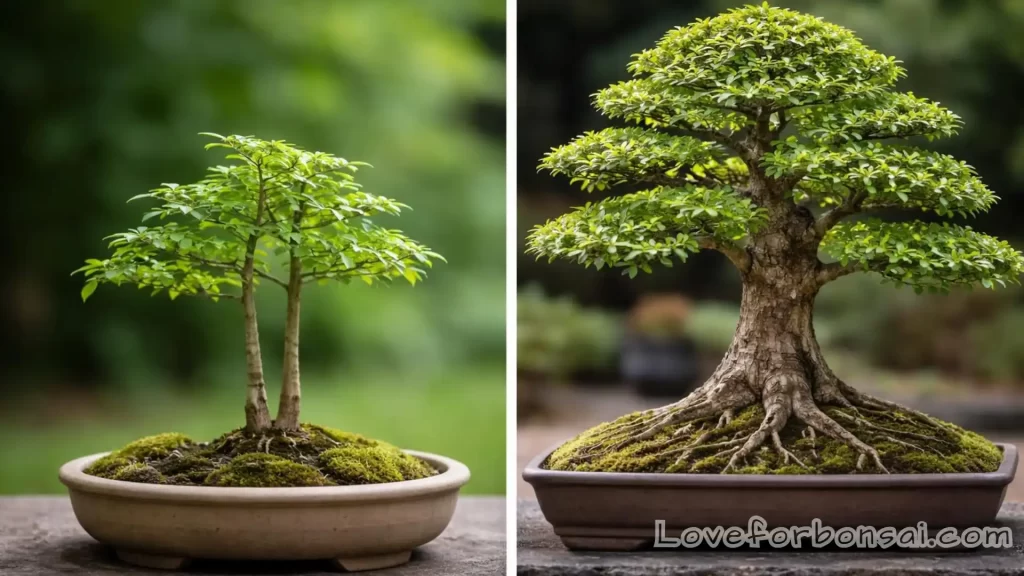
A thick trunk creates visual weight and maturity. It’s the difference between a bonsai that looks like a young sapling and one that looks like a centuries-old tree compressed into a pot. A thin trunk makes even a 20-year-old tree look juvenile. A thick trunk? It commands respect.
Think about real trees in nature. The oldest, most majestic specimens have massive trunks. Your bonsai should tell the same story—even if it’s only 18 inches tall.
The Horticultural Reality
Here’s what most beginners don’t realize: a thicker trunk means a healthier tree. A robust trunk stores more energy reserves, handles stress better, and recovers faster from pruning or environmental shocks. It’s like the difference between a fit athlete and someone out of shape—both can survive, but one thrives.
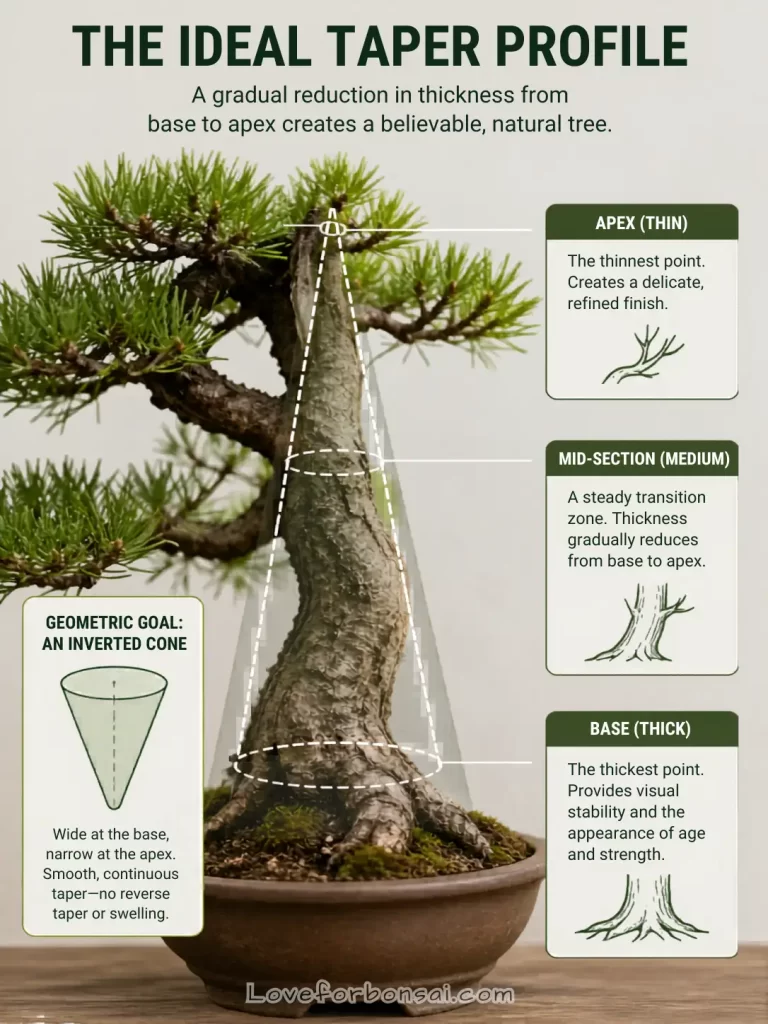
Understanding Trunk Taper
Taper is the gradual narrowing of the trunk from base to apex. A well-tapered trunk looks like an inverted cone—thick and powerful at the base, gradually thinning as it rises toward the branches. This is what separates amateur bonsai from professional-quality specimens.
The challenge? Most young trees grow with parallel trunks (same thickness top to bottom). Your job is to force taper through deliberate techniques.
6 Bonsai Trunk Thickening Methods
Method 1: Ground Growing—The Patient Approach
If you have time and space, this is the most natural way to thicken a trunk.
How Ground Growing Works
Here’s the principle: when a tree is planted in open ground (not a pot), its roots can expand infinitely. More roots = more nutrient uptake = more energy for growth. Your bonsai will enter “growth overdrive.”
The process is simple:
- Remove your bonsai from its pot
- Plant it directly in garden soil or a large container with unrestricted root space
- Let it grow wild for 1–3 years
- Once the trunk reaches your desired thickness, gradually transition it back to a bonsai pot
Timeline & Species Selection
This method is brutally slow for most species. You’re looking at 2–4 years minimum. But with fast-growing species, you can compress that timeline significantly.
Best species for ground growing:
- Chinese Elm — grows aggressively, responds well to pruning, recovers quickly
- Ficus — tropical vigor, rapid trunk thickening, forgiving with mistakes
- Trident Maple — excellent taper development, though slower than elm
- Privet — underrated but incredibly responsive
Realistic timeline:
- Chinese Elm: 12–18 months to visible thickness
- Ficus: 18–24 months
- Trident Maple: 24–36 months
The Pros and Cons
Pros:
- Creates natural, scar-free trunk development
- Builds strong root systems
- Minimal stress on the tree
- Works for any species
Cons:
- Takes years (patience required)
- Requires garden space or large containers
- The trunk may not develop an ideal taper without intervention
- Difficult to control final shape
Method 2: Strategic Trunk Chopping—The Popular Favorite
This is the method that separates the committed from the casual. Trunk chopping is aggressive, effective, and leaves scars—but it works.
The Chopping Principle
When you cut a bonsai trunk, something magical happens: the tree panics and sends out multiple shoots from the cut point. You then select the strongest shoot as your new leader, and repeat the process. Each chop creates a thicker base section.
Think of it like this: you’re forcing the tree to rebuild itself, stronger each time.
The Chopping Process Step-by-Step
First chop (the foundation):
- Decide your desired final height
- Make a clean cut 1–2 inches above that height
- Seal the wound with cut paste or wound sealant
- Wait for shoots to emerge (usually 2–4 weeks)
Subsequent chops:
- Let the new leader grow to 1.5x your target height
- Make the second chop above your target height
- Repeat this process 3–4 times total
Each chop creates a thicker section below it, building taper gradually.
Timeline & Scar Management
Timeline:
- First chop to visible thickening: 6–12 months
- Full trunk development: 2–3 years for 3–4 chops
The scar problem: Yes, chopping leaves visible scars. Here’s the honest truth: they take 3–5 years to fully heal on most species. Some trees (like Ficus) heal faster; others (like Junipers) heal slowly.
Scar management strategies:
- Use quality cut paste immediately after cutting
- Avoid chopping formal upright styles (scars are too visible)
- Consider informal or cascade styles where scars blend naturally
- For show-quality trees, plan for 5+ years of healing time
Which Species Responds Best
- Chinese Elm — heals quickly, responds aggressively
- Ficus — excellent recovery, minimal scarring
- Hornbeam — responds well, good taper development
- Avoid: Junipers (slow healing), Pines (poor recovery)
Method 3: The Sacrificial Branch Technique—The Space-Efficient Solution
Love this method? You should. It’s elegant, effective, and doesn’t require a garden.
How Sacrificial Branching Works
Here’s the concept: you grow a thick branch near the base of the trunk. This branch acts like a “nutrient highway,” feeding the main trunk and forcing it to thicken. Meanwhile, you keep the rest of the tree pruned and styled normally.
Once the trunk reaches your desired thickness, you remove the sacrificial branch. Yes, it leaves a scar—but it’s localized and manageable.
The Execution
Setup:
- Identify a branch near the base of your trunk (ideally on the side that will be hidden in your final design)
- Stop pruning this branch entirely
- Let it grow wild while maintaining the rest of the tree
The growth phase (12–24 months):
- The sacrificial branch will grow thick and vigorous
- The trunk beneath it will visibly thicken
- Continue normal styling on the rest of the tree
- Monitor the branch—it should be 2–3x thicker than the trunk
Removal and recovery:
- Once the trunk is thick enough, cut off the sacrificial branch
- Seal the wound with cut paste
- Allow 2–3 years for scar healing
The Advantages
- Space-efficient — no need for ground growing
- Controlled — you can style the rest of the tree normally
- Predictable — you see results within 12–18 months
- Reversible — if something goes wrong, you still have your tree
The Disadvantages
- Leaves a visible scar (though smaller than chopping)
- Requires patience during the growth phase
- The branch location must be chosen carefully
- Not ideal for trees where all branches are visible
Method 4: Trunk Merging (Fusion)—The Advanced Technique
Want the fastest trunk thickening possible? This is it. But it requires patience, precision, and acceptance of failure.
What Is Trunk Merging?
Imagine taking 2–3 small saplings and fusing them into a single trunk. That’s trunk merging. The individual trees literally grow together, creating one thick trunk from multiple thin ones.
It’s like braiding hair, except the hair is alive and growing.
The Merging Process
Phase 1: Preparation (Week 1)
- Select 2–3 fast-growing saplings of similar size (Chinese Elm or Ficus work best)
- Plant them close together in a large pot (1–2 inches apart)
- Ensure they’re at the same height
Phase 2: Fusion (Months 1–6)
- Tie the saplings together loosely with soft wire or fabric strips
- As they grow, they’ll begin to touch and fuse
- Gradually tighten the binding to encourage fusion
- Keep the pot well-watered and fertilized
Phase 3: Grafting (Months 6–12)
- Once the trunks have begun to fuse, you can optionally graft branches from one tree onto another
- This accelerates the merging process
- Remove the binding carefully once fusion is complete
Phase 4: Styling (Year 2+)
- Once fully fused, you have a single thick trunk
- Begin normal bonsai styling and refinement
The Reality Check
Success rate: 60–80% with experience, 30–50% for beginners
Common problems:
- One or more saplings die during fusion (have backup saplings ready)
- Uneven fusion creates gaps in the trunk
- Fusion takes longer than expected (up to 18 months)
- The final trunk may look unnatural if fusion is incomplete
Timeline
- Fusion: 6–12 months
- Full integration: 12–18 months
- Usable trunk: 18–24 months
- Total time to thick trunk: 2–3 years (faster than other methods, but requires active management)
Method 5: Trunk Splitting—The Aggressive Approach
This method is for the bold. You’re literally splitting your tree’s trunk and forcing it to heal thicker. It’s traumatic for the tree but incredibly effective.
How Trunk Splitting Works
The principle: when you split a trunk and keep it apart with wedges, the tree heals by growing new wood around the gap. This new growth is thick and strong.
It’s radical, but it works.
The Splitting Process
Preparation:
- Remove your bonsai from its pot
- Gently wash away excess soil from the roots
- Identify the split point (usually 2–4 inches from the base)
The split:
- Use a trunk splitter, wood chisel, or rotary tool to split the trunk vertically
- Split from the base upward, going about 1/3 to 1/2 the trunk’s height
- Insert wood wedges or thick wires to keep the split open (1/4 to 1/2 inch gap)
Post-split care:
- Immediately repot in a wide, shallow container with fresh soil
- Use well-draining soil mix (akadama, pumice, bark)
- Allow roots to spread freely and establish
- Water carefully but regularly
- Keep in bright, indirect light for 4–6 weeks
Healing timeline:
- New growth visible: 4–8 weeks
- Significant thickening: 6–12 months
- Full healing: 2–3 years
Which Species Handle Splitting Best
Excellent response:
- Ficus (tropical vigor, fast healing)
- Boxwood (responds well, strong recovery)
- Junipers (surprisingly resilient)
Good response:
- Elms (reliable, predictable)
- Maples (decent recovery)
Poor response (avoid):
- Pines (weak recovery, often die)
- Spruces (too brittle)
- Conifers in general (risky)
The Risks
- Tree may not survive the trauma (especially older specimens)
- Infection or rot if wound care is poor
- Uneven healing creates ugly scars
- Requires expert-level care during recovery
Method 6: Bending & Wiring—The Scar-Free Solution
Want trunk thickening without any scars? This is your method. It’s subtle, elegant, and works best with young, flexible trees.
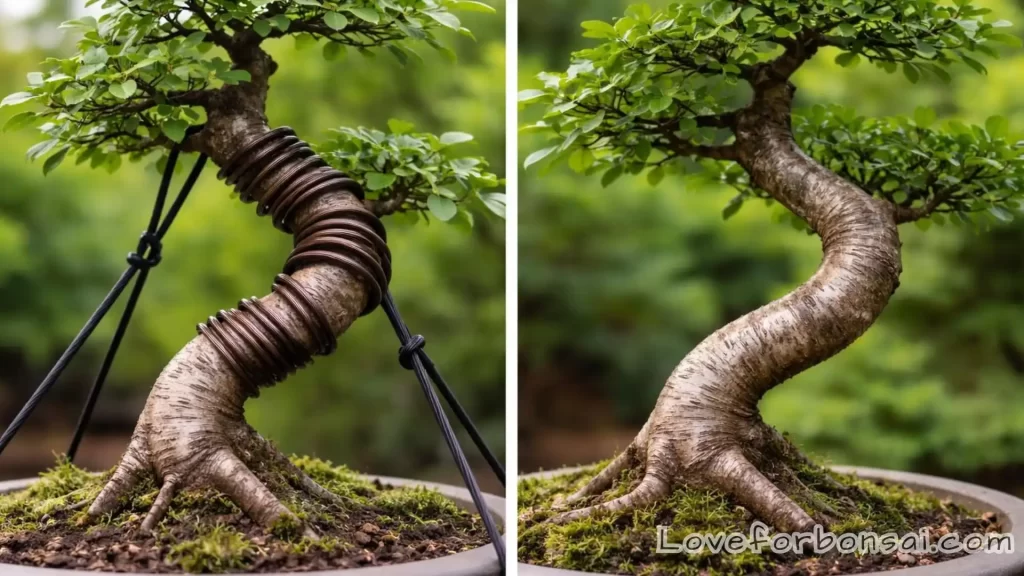
The Bending Principle
When you bend a trunk and hold it in place with wire, the tree responds by thickening the bent area. The wood swells as it heals, creating natural thickness without cuts or trauma.
Think of it like exercise—the stressed wood responds by building strength.
The Execution
Timing is critical:
- Start with young saplings (1–2 years old)
- Bending older wood is nearly impossible without breaking
- Flexibility decreases with age
The process:
- Use soft aluminum wire (size 4–6mm depending on trunk thickness)
- Wrap the wire around the trunk in a spiral pattern
- Gently bend the trunk to your desired angle
- Secure the wire to the pot or a stake
- Leave in place for 6–12 months
- Check monthly—loosen if the wire cuts into the bark
Thickening happens:
- The bent section swells as the tree heals
- Both the trunk and branches thicken together
- After 12–18 months, you’ll see significant thickness
- Remove the wire and the tree maintains its shape
The Advantages
- Zero scars
- Works on any species
- Combines trunk thickening with styling
- Relatively quick (12–18 months)
The Disadvantages
- Only works on young, flexible trees
- Requires precise wire management (too tight = damage, too loose = ineffective)
- The bent shape is permanent (you can’t straighten it later)
- Less dramatic thickening than other methods
Comparison Table: All Six Methods at a Glance
| Method | Time Required | Difficulty | Scarring | Space Needed | Best Species | Cost |
| Ground Growing | 2–4 years | Low | None | Large | Chinese Elm, Ficus | Low |
| Trunk Chopping | 2–3 years | Medium | Significant | Small | Elm, Ficus, Hornbeam | Low |
| Sacrificial Branch | 12–24 months | Low | Minor | Small | Any | Low |
| Trunk Merging | 2–3 years | High | Minimal | Medium | Chinese Elm, Ficus | Medium |
| Trunk Splitting | 12–18 months | High | Moderate | Small | Ficus, Boxwood, Juniper | Low |
| Bending & Wiring | 12–18 months | Medium | None | Small | Young trees only | Low |
Choosing Your Method: A Decision Framework
You have limited space? → Sacrificial Branch or Bending & Wiring
You want results fast? → Trunk Merging or Trunk Splitting
You have years of patience? → Ground Growing (best results)
You want zero scars? → Bending & Wiring or Ground Growing
Your tree is young and flexible? → Bending & Wiring
Your tree is mature and established? → Trunk Chopping or Sacrificial Branch
Common Mistakes That Sabotage Trunk Development
- Giving up too early — Trunk thickening takes years. If you’re expecting results in 6 months, you’ll be disappointed.
- Fertilizer neglect — Thickening requires energy. Use a balanced fertilizer (NPK 10-10-10) monthly during the growing season.
- Poor species selection — Slow-growing species (Pines, Junipers) take forever. Fast-growing species (Elm, Ficus) are your friends for trunk development.
- Inconsistent watering — Stress from drought slows growth. Keep soil consistently moist (not waterlogged).
- Inadequate light — Weak light = weak growth. Your thickening tree needs 6+ hours of bright light daily.
- Pruning during development — Stop pruning the trunk area while you’re thickening it. Let it grow wild.
- Wrong pot size — Too small = restricted roots = slow growth. Use a large pot (or ground) during thickening phases.
Conclusion: Your Trunk Thickening Roadmap
Here’s what I want you to take away: trunk thickening is not complicated—it’s just slow. There’s no magic. There’s no shortcut. There’s only patience, consistency, and the right technique for your situation.
The trunk is your bonsai’s foundation. Invest in it now, and you’ll have a masterpiece in 3–5 years. Rush it or ignore it, and you’ll be frustrated forever.
My recommendation? Start with the Sacrificial Branch method if you’re a beginner with limited space. It’s forgiving, effective, and teaches you patience without requiring a garden. Once you’ve mastered that, experiment with other methods.
Remember: every master bonsai artist you admire has spent years developing thick, powerful trunks. They didn’t get lucky. They were deliberate. They were patient. They understood that the trunk is everything.
Now it’s your turn. Pick your method, commit to the timeline, and start building the foundation for your masterpiece.
Frequently Asked Questions
Q1: How long does it really take to thicken a bonsai trunk?
A: Honest answer? 2–3 years minimum for noticeable results, 3–5 years for a truly impressive trunk. The Sacrificial Branch method is fastest (12–24 months), while Ground Growing is slowest (2–4 years). Species matters enormously—Chinese Elm thickens in half the time of a Trident Maple. Don’t expect miracles in one season.
Q2: Can I thicken an old, thin bonsai trunk?
A: Yes, but it’s harder. Older trees have slower growth rates and less vigor. Your best bet is the Sacrificial Branch method or Trunk Splitting (if the species tolerates it). Ground Growing also works but takes even longer. Avoid Bending & Wiring—old wood is too brittle. Accept that you’ll need 3–4 years, not 2.
Q3: Which method leaves the least visible scarring?
A: Bending & Wiring and Ground Growing produce zero scars. Trunk Merging produces minimal scarring if done correctly. Sacrificial Branch leaves a localized scar (manageable). Trunk Chopping leaves the most obvious scars (3–5 year healing). Trunk Splitting falls in the middle. If aesthetics are your priority, choose Bending & Wiring for young trees or Ground Growing for any age.
Q4: What if my trunk splitting goes wrong and the tree doesn’t heal?
A: Risk is real—some trees don’t survive splitting. That’s why species selection matters. Ficus and Boxwood are forgiving; Pines and Spruces are risky. If your tree survives but heals poorly, you can still use it for practice or propagation. Always have backup trees. The lesson? Don’t split your only specimen. Experiment on trees you can afford to lose.
Q5: Can I combine multiple thickening methods on the same tree?
A: Absolutely. Many advanced growers combine Ground Growing (for 12 months) with Trunk Chopping (for controlled taper). Or use Sacrificial Branch while the tree is in the ground. The key is sequencing—don’t stress the tree with multiple techniques simultaneously. Use one method to build thickness, then switch to another for refinement. This approach can compress your timeline from 3–4 years to 2–3 years.